> ## Documentation Index
> Fetch the complete documentation index at: https://arize-ax.mintlify.site/docs/llms.txt
> Use this file to discover all available pages before exploring further.
# Test Your Prompt in the Playground
> Load a trip planner dataset into the Prompt Playground and run your prompt across multiple examples to evaluate performance.
You've created a trip planner prompt and saved it to Prompt Hub. Now it's time to see how it performs across real examples. The Prompt Playground lets you load a dataset, run your prompt against every row, and attach evaluators to measure quality — all without writing any code.
By the end of this tutorial, you'll have an experiment showing how your trip planner prompt handles different destinations, durations, and travel styles.
***
## Step 1: Create Your Dataset
### Download Examples
Before testing in the Playground, you need a dataset in Arize AX. Navigate to **Datasets and Experiments** in the left sidebar.
Upload this small trip planner dataset, which contains examples spanning destinations like Istanbul, Dubai, San Francisco, Bangkok, Reykjavik, Barcelona, Cape Town, and New York — each with different durations and travel styles.
Your dataset includes the following columns that map to template variables in your prompt:
| Column | Maps to Variable |
| ------------------------------------------------------- | ---------------- |
| `attributes.llm.prompt_template.variables.destination` | `{destination}` |
| `attributes.llm.prompt_template.variables.duration` | `{duration}` |
| `attributes.llm.prompt_template.variables.travel_style` | `{travel_style}` |
| `attributes.llm.prompt_template.variables.research` | `{research}` |
| `attributes.llm.prompt_template.variables.budget_info` | `{budget_info}` |
| `attributes.llm.prompt_template.variables.local_info` | `{local_info}` |
The dataset also includes an `output_content` column with existing model outputs. You can use this as a reference when evaluating your prompt's performance.
### Create Dataset in Arize AX
In the **Datasets and Experiments** section, create a new dataset, name it (ex: `trip-planner-dataset`), and upload the `trip_planner_dataset.csv` file you downloaded.
Use the Arize SDK to create the dataset from the CSV:
```python theme={null}
import pandas as pd
from arize import ArizeClient
client = ArizeClient(api_key=os.getenv("ARIZE_API_KEY"))
dataset_df = pd.read_csv("trip_planner_dataset.csv")
dataset = client.datasets.create(
name="trip-planner-examples",
space_id=os.getenv("ARIZE_SPACE_ID"),
examples=dataset_df,
)
```
## Step 2: Open the Playground and Load Your Prompt
1. Navigate to **Playgrounds** from the left sidebar.
2. Create a new **Playground View** and name it (e.g. `trip-planner-test`).
3. Use the **Load a prompt** dropdown to load the first version of your `trip-planner` prompt.
4. Your system message and user message template will populate automatically, including all the `{variable}` placeholders.
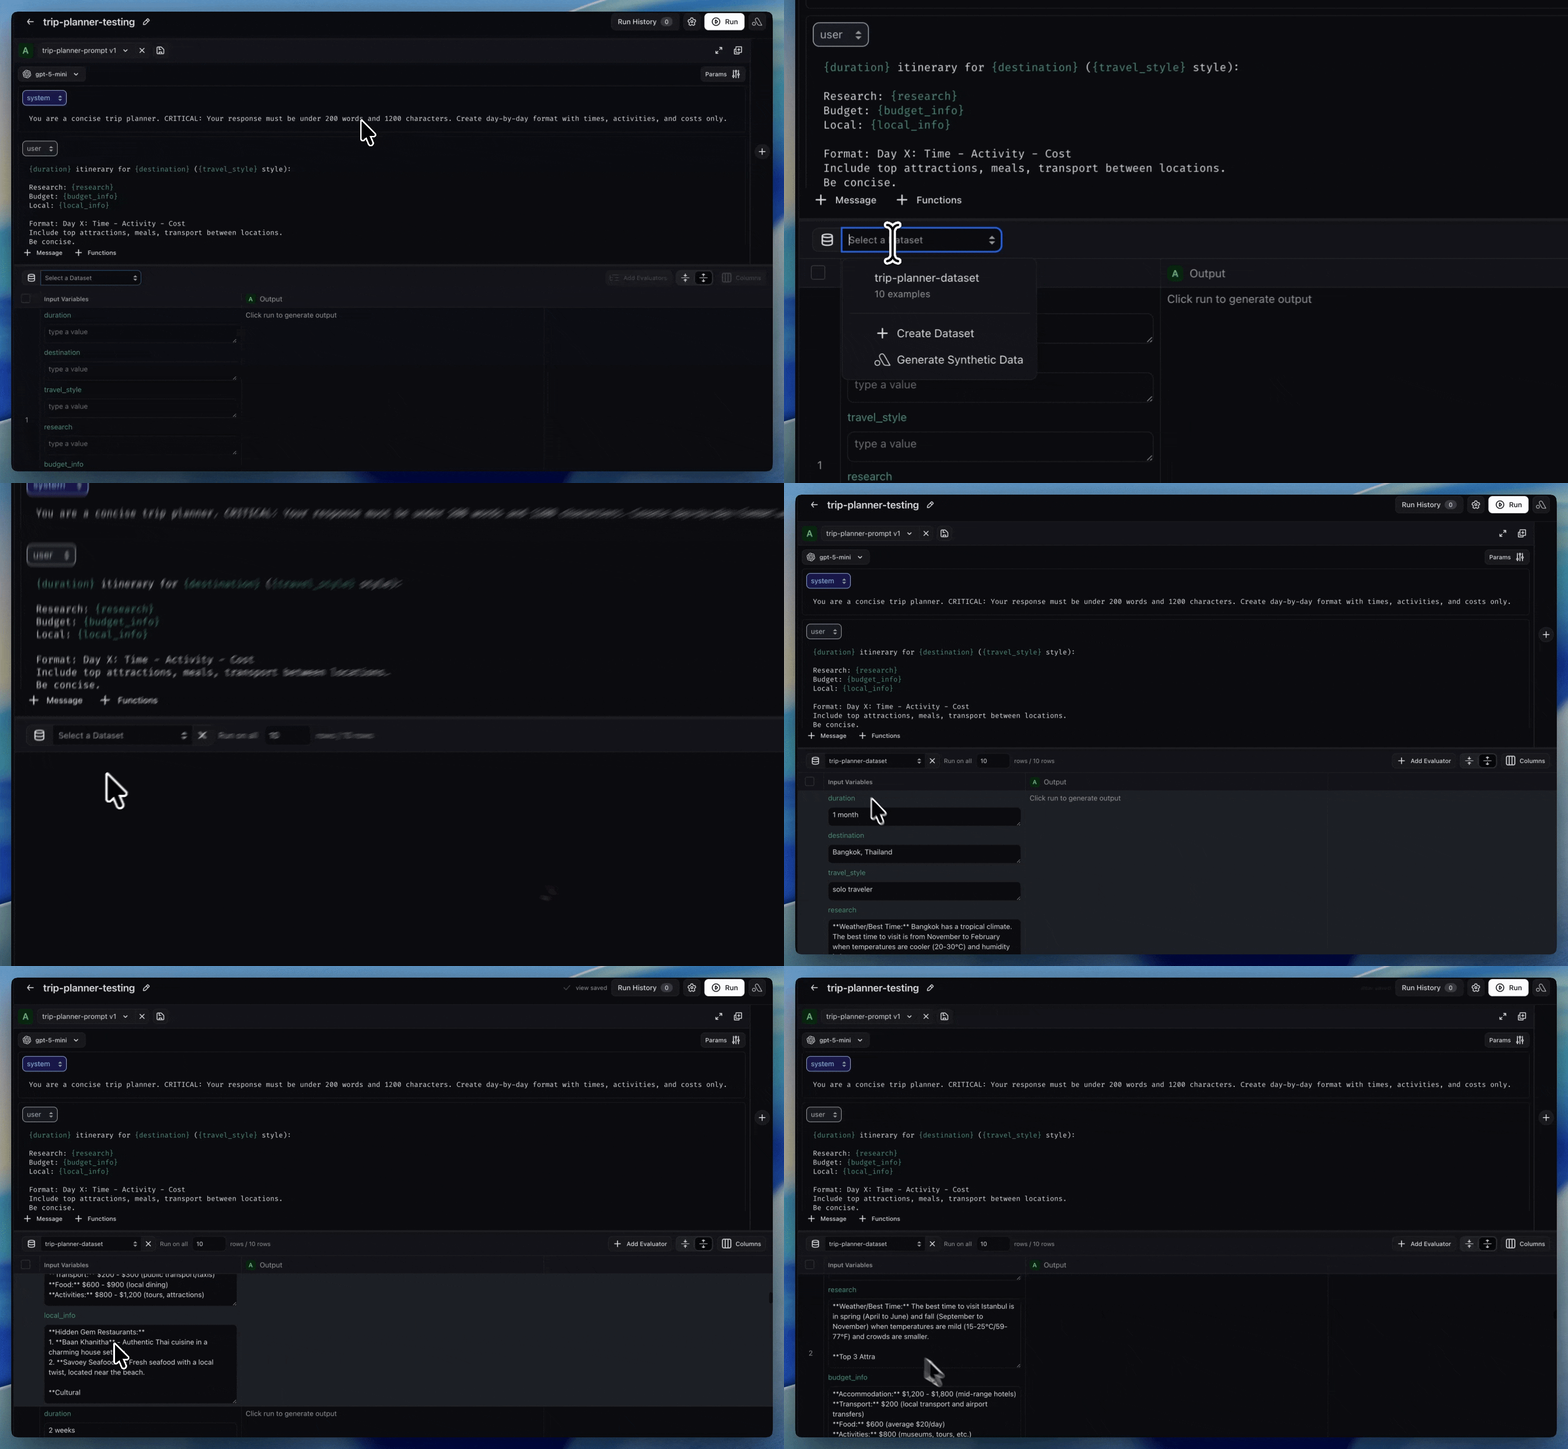
## Step 3: Attach Your Dataset
1. Use the **Select a Dataset** dropdown to choose `trip-planner-dataset`
2. The Playground will map your dataset columns to the template variables in your prompt
Once the dataset is loaded, you'll see the template variables highlighted in your prompt. Each row in the dataset represents a different trip scenario — from a 2-week standard trip to Istanbul, to a long weekend adventure in Reykjavik, to a family-friendly week in Istanbul.
For more details on testing prompts on datasets, see the [Test prompts on datasets](/docs/ax/prompts/prompt-playground/save-playground-outputs-as-an-experiment) guide.
 ## Step 4: Add Evaluators
Before running the experiment, you can attach evaluators to measure the quality of the generated itineraries. In this tutorial, we'll create a **custom [LLM-as-a-Judge](/docs/ax/evaluate/evaluators/llm-as-a-judge) evaluator** that checks whether the trip planner's output meets our specific quality criteria.
### Create a Custom LLM-as-a-Judge Evaluator
1. **Select Add Evaluator**: Click **Add Evaluator** and choose **LLM-as-a-Judge**, then select **Create From Blank** to define your own evaluation criteria.
2. **Name the evaluator**: Give it a descriptive name like "Trip Plan Completeness". This name appears in your experiment results, so choose something that clearly communicates what the evaluator measures.
3. **Pick a judge model**: Select the LLM that will serve as the judge.
* Choose a **model** — use a different model than the one generating itineraries (e.g., use `gpt-5` as the judge if `gpt-5-mini` generated the output)
4. **Define the evaluation template**: The prompt template is the core of your evaluator. It describes the judge's role, the criteria for each label, and the data it will see. Here's a template tailored to our trip planner:
```text LLM-as-a-Judge Prompt Template expandable theme={null}
You are an expert evaluator judging whether a travel planner's
response is correct. The planner must create a trip plan with:
(1) essential info, (2) budget breakdown, and (3) local experiences.
CORRECT - The response:
- Accurately addresses the user's destination, duration, and travel style
- Includes essential travel info (weather, key attractions, etiquette)
- Mentions budget or cost details
- No major logical errors
INCORRECT - The response contains any of:
- Major errors about the destination, costs, or local info
- Missing essential info when a full trip plan was requested
- Wrong destination, duration, or travel style addressed
[BEGIN DATA]
************
[User Input]:
{input_user}
************
[Travel Plan]:
{output}
************
[END DATA]
Is the output correct or incorrect?
```
5. **Define labels**: Set the output labels that constrain what the judge can return:
* **correct** (score: 1) — the response meets all criteria
* **incorrect** (score: 0) — the response fails one or more criteria
6. **Enable explanations**: Toggle Explanations to **On** so the judge provides a brief rationale for each label. This helps you understand *why* specific itineraries passed or failed.
For a deeper dive into building custom evaluators, see [Create a custom LLM-as-a-Judge eval](/docs/ax/evaluate/create-evaluators#tutorial-create-a-custom-llm-as-a-judge-eval).
## Step 5: Run the Experiment
With your prompt, dataset, and evaluator in place, you're ready to run a **Playground Experiment**. Click **Run** to execute the experiment. The Playground will:
1. Iterate through each row in your dataset
2. Fill in the template variables with the row's values
3. Send the completed prompt to your selected model
4. Run each evaluator on the generated output
Click **View Experiment** to see the detailed results.
## Step 6: Review Results
In the experiment results view, you can:
* **Compare outputs across examples**: See how the prompt handles a 2-week Istanbul trip versus a long weekend in Reykjavik
* **Check evaluator scores**: Filter by evaluation labels to find which examples passed or failed
* **Read judge explanations**: Understand why specific outputs were scored the way they were
* **Identify patterns**: Look for systematic issues — does the prompt struggle with longer trips? Does it miss budget constraints for certain travel styles?
Pay attention to edge cases in the dataset. The trip planner examples include a range of durations (weekend to 1 month), travel styles (solo, family, romantic, group), and destinations. If the prompt performs well on most but struggles with specific combinations, that's a signal for optimization.
### Compare Multiple Prompt Versions
If you want to test a revised prompt side-by-side with the original, use the **+** button to add another prompt object. You can compare up to 3 prompts simultaneously. This is useful for quickly validating whether a change improves or regresses performance.
See [Test multiple prompts at once](/docs/ax/prompts/prompt-playground/compare-prompts-side-by-side) for more details.
***
## Next Steps
You've now tested your trip planner prompt across a diverse dataset and have structured evaluation data showing:
* Which examples the prompt handles well
* Where it struggles or produces outputs that don't meet quality criteria
* Specific patterns in failures that can guide improvements
In the next step, you'll use Prompt Optimization to automatically improve your prompt based on this evaluation data.
## Step 4: Add Evaluators
Before running the experiment, you can attach evaluators to measure the quality of the generated itineraries. In this tutorial, we'll create a **custom [LLM-as-a-Judge](/docs/ax/evaluate/evaluators/llm-as-a-judge) evaluator** that checks whether the trip planner's output meets our specific quality criteria.
### Create a Custom LLM-as-a-Judge Evaluator
1. **Select Add Evaluator**: Click **Add Evaluator** and choose **LLM-as-a-Judge**, then select **Create From Blank** to define your own evaluation criteria.
2. **Name the evaluator**: Give it a descriptive name like "Trip Plan Completeness". This name appears in your experiment results, so choose something that clearly communicates what the evaluator measures.
3. **Pick a judge model**: Select the LLM that will serve as the judge.
* Choose a **model** — use a different model than the one generating itineraries (e.g., use `gpt-5` as the judge if `gpt-5-mini` generated the output)
4. **Define the evaluation template**: The prompt template is the core of your evaluator. It describes the judge's role, the criteria for each label, and the data it will see. Here's a template tailored to our trip planner:
```text LLM-as-a-Judge Prompt Template expandable theme={null}
You are an expert evaluator judging whether a travel planner's
response is correct. The planner must create a trip plan with:
(1) essential info, (2) budget breakdown, and (3) local experiences.
CORRECT - The response:
- Accurately addresses the user's destination, duration, and travel style
- Includes essential travel info (weather, key attractions, etiquette)
- Mentions budget or cost details
- No major logical errors
INCORRECT - The response contains any of:
- Major errors about the destination, costs, or local info
- Missing essential info when a full trip plan was requested
- Wrong destination, duration, or travel style addressed
[BEGIN DATA]
************
[User Input]:
{input_user}
************
[Travel Plan]:
{output}
************
[END DATA]
Is the output correct or incorrect?
```
5. **Define labels**: Set the output labels that constrain what the judge can return:
* **correct** (score: 1) — the response meets all criteria
* **incorrect** (score: 0) — the response fails one or more criteria
6. **Enable explanations**: Toggle Explanations to **On** so the judge provides a brief rationale for each label. This helps you understand *why* specific itineraries passed or failed.
For a deeper dive into building custom evaluators, see [Create a custom LLM-as-a-Judge eval](/docs/ax/evaluate/create-evaluators#tutorial-create-a-custom-llm-as-a-judge-eval).
## Step 5: Run the Experiment
With your prompt, dataset, and evaluator in place, you're ready to run a **Playground Experiment**. Click **Run** to execute the experiment. The Playground will:
1. Iterate through each row in your dataset
2. Fill in the template variables with the row's values
3. Send the completed prompt to your selected model
4. Run each evaluator on the generated output
Click **View Experiment** to see the detailed results.
## Step 6: Review Results
In the experiment results view, you can:
* **Compare outputs across examples**: See how the prompt handles a 2-week Istanbul trip versus a long weekend in Reykjavik
* **Check evaluator scores**: Filter by evaluation labels to find which examples passed or failed
* **Read judge explanations**: Understand why specific outputs were scored the way they were
* **Identify patterns**: Look for systematic issues — does the prompt struggle with longer trips? Does it miss budget constraints for certain travel styles?
Pay attention to edge cases in the dataset. The trip planner examples include a range of durations (weekend to 1 month), travel styles (solo, family, romantic, group), and destinations. If the prompt performs well on most but struggles with specific combinations, that's a signal for optimization.
### Compare Multiple Prompt Versions
If you want to test a revised prompt side-by-side with the original, use the **+** button to add another prompt object. You can compare up to 3 prompts simultaneously. This is useful for quickly validating whether a change improves or regresses performance.
See [Test multiple prompts at once](/docs/ax/prompts/prompt-playground/compare-prompts-side-by-side) for more details.
***
## Next Steps
You've now tested your trip planner prompt across a diverse dataset and have structured evaluation data showing:
* Which examples the prompt handles well
* Where it struggles or produces outputs that don't meet quality criteria
* Specific patterns in failures that can guide improvements
In the next step, you'll use Prompt Optimization to automatically improve your prompt based on this evaluation data.